Sheaffer Repair Tools
These tools were designed to prevent people from going nuts while working on Sheaffer pens.
Plese see our Specialized Pliers
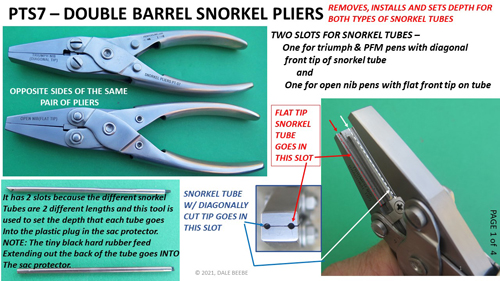
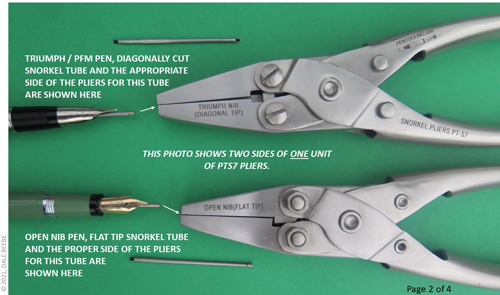
ITEM #PTS7: PLIERS FOR REMOVING AND INSTALLING SHEAFFER SNORKELS. In addition, this tool sets the depth of each of the two types of Snorkels into the sac protectors.
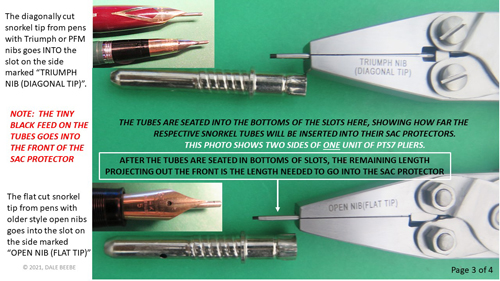
One type is the Snorkel tube with the diagonally cut front tip, used in pens with PFM nibs or Triumph nibs.
The other type is the Snorkel tube with the flat front tip, used in pens with traditional open nibs.
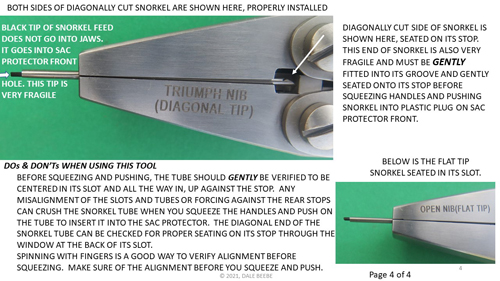
Inserting the Snorkel and seating it on its inner stop inside the plier's jaws will leave the proper amount of Snorkel tube hanging out of the pliers jaws for insertion into the sac protector.
$65
Fine Print:Click to see the next 4 slides in a larger, clearer format...Use your browser's back arrow to return here
To buy please email Pentooling. Be sure and provide a shipping address so a shipping cost can be calculated. Please make sure PayPal has your correct shipping address, as we use PayPal to generate our shipping labels.
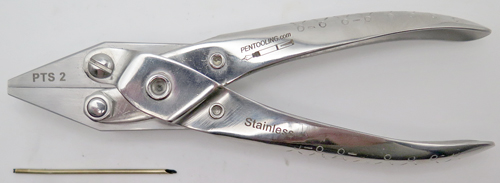
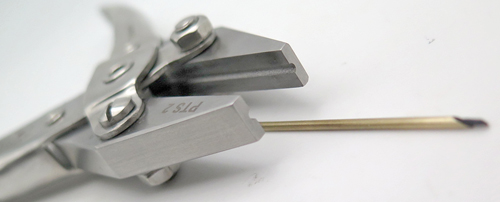
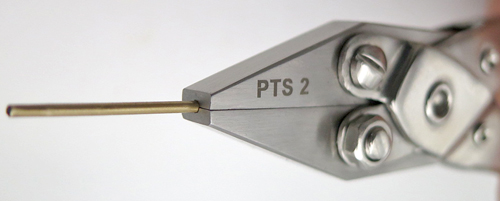
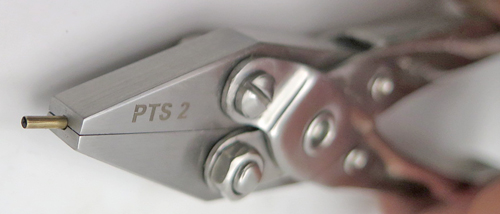
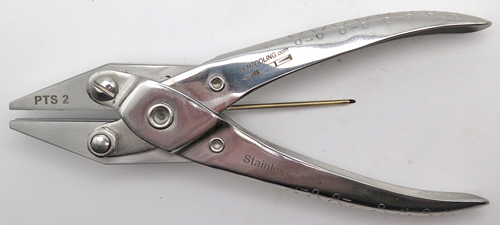
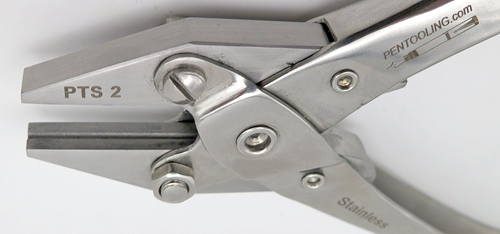
ITEM #PTS2: SIMPLE SNOKEL PLIERS. PARALLEL JAW SET OF PLIERS WITH A 1/16" GROVE. THE SLOT/GROVE RUNS FROM THE FRONT OF THE JAWS THROUGH THE BACK OF THE PLIERS. USED TO INSERT AND REMOVE SNORKEL TUBES WITHOUT DAMAGING THEM.
Works on both flat & diagonal Snorkel tubes. Not as complex as our PTS7 double barreled pliers, but a very useful tool specialized for Sheaffer Snorkel Fountain Pens.
Be sure Snorkel tube is aligned in the slot/grove before compressing the handle of the pliers. Tube not included.
$35
To buy please email Pentooling. Be sure and provide a shipping address so a shipping cost can be calculated. Please make sure PayPal has your correct shipping address, as we use PayPal to generate our shipping labels.
$170

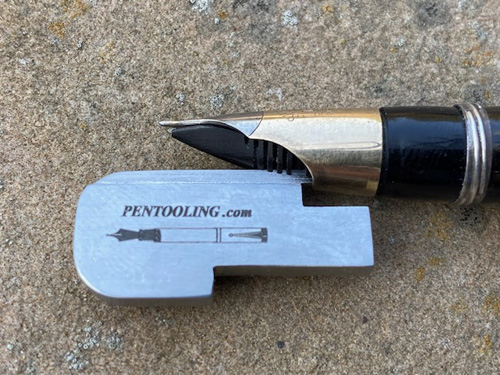
Each Triumph nib removal tool kit consists of 5 parts: Two 2” diameter high temperature plastic disks, two identical keys, two allen head screws and two silicone rubber bands.
The disks feature conical bores which closely match the profiles of the two most common Sheaffer Vac Fil pen’s Triumph nibs. There are two different disks in the tool kit, one with angles fitting the earlier, less steep (9°) Standard nib, which 90% of the Triumph Vac Fil nibs will fit snugly into, and another disk to fit the steeper (13°) Special nibs. The Standard nib is on pens that held ink directly in contact with the sides of the barrel. The Special nib is on the later pens that use an internal, non-removable, non-disposable cartridge/plunger assembly to hold the ink.
If you want to read the user's manual, Click here.-use your browser's back arrow to return here
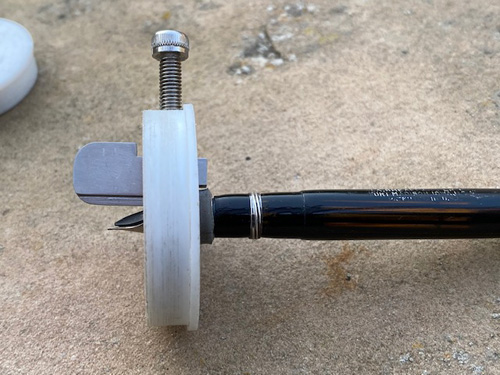
This is Francis Goossen's Fountainbel Sheaffer Triumph Nib Removal tool design now manufactured and sold exclusively by Pentooling.
Click here for info on an IR thermometer well suited for use with the Triumph nib removal tool:
IR Thermometer It's the first item on the page. Use your browser's back arrow to return here.
To buy please email Pentooling. Be sure that Paypal has your correct shipping address in your profile. We use them to generate our shipping labels and we cannot correct them, only you can.
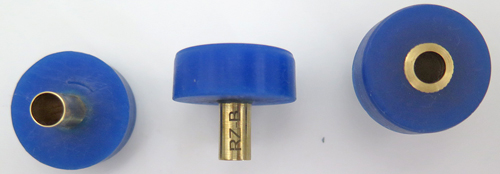
ITEM #RZ: SHEAFFER VAC FILL REPLACEMENT SEAL SEATING TOOL.
This tool was developed over 10 years ago by pen repair pengineer Ron Zorn (thus the part number designation 'RZ'). He came up to my table at a pen show about a year ago and expressed the belief that it would be a good move for the pen repair community if I manufactured and made this tool available. I should also mention Nathan Tardif who developed the technique of Vac Filler seal replacement with an O-ring and a soluble plastic washer used as an adhesive to hold the O-ring in place (this tool is used for that installation). This method is an evolutionary advancement over Father Terry Koch's method of using an orange foam washer to do the same. The problem with that method was that in a few years the foam seal would begin to harden and fall apart. Nathan's method uses an O-ring seal made from a material that is extremely durable in this application.
$20
**tool comes with (5) O-rings +
(5) soluble plastic washers**


The steps for replacement are as follows:
1) Remove the old seal which consists of a hard plastic washer over a toroidal felt packing that is about 3/32" thick. This is done by using a ¼" drill bit and going no more than ¼" deep (lest you punch-out through the back of the barrel) and then using a bent 90 degree probe (the D13 micro probe is ideal for this) and/or a ¼" reamer to clean the cavity out to make room for the new seal. Be very careful how deep you go so as not to come through the back of the barrel. Insert your drill bit into the barrel before you start and use a thin strip of masking tape placed ¼" above where the bit comes out of the open end of the barrel so you know the limits of how far in you can drill into the back end seal. And don't go that far in right away; go maybe half that far and work with the pick and reamer to get the old seal out and get a good, cleaned out cavity down there for the new seal. If you're good (and lucky) sometimes you can pop the hard plastic cover off the seal, pull it out, and fish the felt out all in one or two pieces. The JL droplight with its tiny LED is ideal for internal inspection during this process.
2) Place an O-ring on the end of the RZ tool with the thinner diameter and push the assembly into the cavity you've just made in the back (seal) end of the barrel. Pull the RZ tool out and verify with the drop light that the O-ring is flatly seated at the end of the barrel and that it is centered and is not turned sideways.
3) Now you place a white soluble plastic washer on the other end of the RZ tool that has the larger of the two end diameters. This fit is looser than that with the O-ring, so you may have to hold the pen barrel vertically and insert the assembly upwards into the barrel. Push the tool with the plastic washer on it into the barrel on top of the O-ring, turn the whole assembly over so the seal end of the barrel is down and pull the tool out. Again use the light to verify that the plastic washer is flat, centered, and not sideways.
4) Holding the barrel with the open side facing vertically up. Use a pipette to put one or 2 drops of acetone on top of the O-ring / white soluble plastic washer (butyrate)/ pen seal cavity sandwhich. Maintaining this vertical position, set the barrel aside, in something like a knock-out block and let it dry out overnight. You should think about doing the acetone work outdoors as it isn't healthy to breathe.
5) To get the pen's plunger shaft through the new seal the first time, you may need to put a dollop of silicone grease on the tip of the shaft before forcing it through.
6) It should be mentioned that there is a tool available (D9, an improved version of an old Sheaffer tool) with a wooden handle and a shaft the same diameter as the Vac Fil shaft with a dimple on the end. Insert the dimple end of the D9 shaft into the outer hole in the barrel that the threaded shaft will eventually come through from the inside. This is intended to help you align the threaded back end of the Vac Fil shaft with the hole in the seal end of the barrel to simplify this tedious operation. You may want to have one of these laying on your bench during the above operations. It is shown on this web page as RZ (that stands for Ron Zorn, who invented it).
7) The RZ tool comes with (5) O-rings and (5) soluble plastic washers.
8) So the other tools you may want to have on your bench while doing this are:
a. The RZ (the subject of this listing)
b. The D9 shaft alignment tool (the next item down on this page)
c. A ¼" drill bit (Listed a few items down on this page) and a thin strip of masking tape.
d. A ¼” flat ended reamer (you don’t want a centering reamer, as the centering tip may knock the shoulder off the inside hole for the shaft). Listed a few items down on this page.
CLICK ON THESE LINKS TO SEE OTHER TOOLS RELEVANT TO THE USE OF THE RZ TOOL, and use your browser's back arrow to return here:
The D13 Micro Probe
The JL Drop Light
Silicone Grease (3rd item down)
Pipette (4th item down)
To buy please email Pentooling. Be sure and provide a shipping address so a shipping cost can be calculated. Please make sure PayPal has your correct shipping address, as we use PayPal to generate our shipping labels.
$20
To buy please email Pentooling. Be sure and provide a shipping address so a shipping cost can be calculated. Please make sure PayPal has your correct shipping address, as we use PayPal to generate our shipping labels.
$10


To buy please email Pentooling. Be sure and provide a shipping address so a shipping cost can be calculated. Please make sure PayPal has your correct shipping address, as we use PayPal to generate our shipping labels.
$5
To buy please email Pentooling. Be sure and provide a shipping address so a shipping cost can be calculated. International buyers please include a phone number or we can't be responsible for your postal service not being able to contact you.
$21
To buy please email Pentooling. Be sure and provide a shipping address so a shipping cost can be calculated. Please make sure PayPal has your correct shipping address, as we use PayPal to generate our shipping labels.
$20

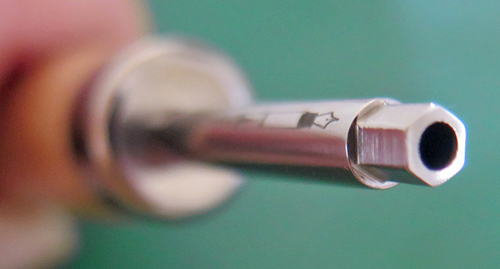
To buy please email Pentooling. Be sure and provide a shipping address so a shipping cost can be calculated. Please make sure PayPal has your correct shipping address, as we use PayPal to generate our shipping labels.
$51
To buy please email Pentooling. Be sure that Paypal has your correct shipping address in your profile. We use them to generate our shipping labels and we cannot correct them, only you can.
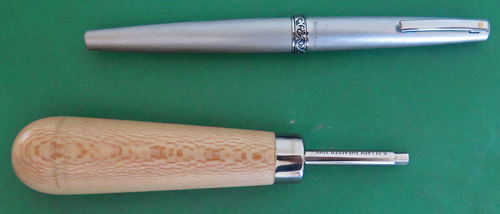
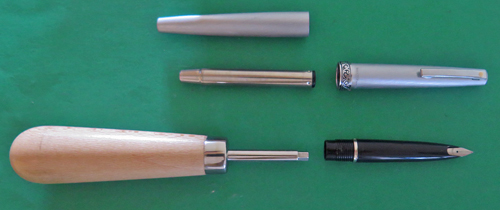
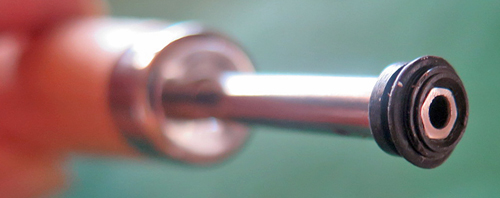
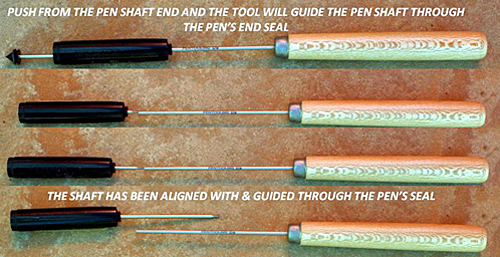
ITEM #D9: SHEAFFER PLUNGER SHAFT GUIDE - IMPROVED. This and the next four tools are intended to prevent you from going nuts while working on Sheaffer pneumatics (Plungers, Snorkels, and TouchDowns). This tool makes it unnecessary for you to poke the plunger shaft around trying to find the hole that goes through the rear of the barrel/seal while inserting the threaded tip of the plunger back through the seal. This operation is especially difficult since the plunger shaft length is close to the length of the barrel of the pen and your fingers don't fit into the barrel. This is almost an exact duplicate of the Sheaffer tool found in Sheaffer repair guy's tool kits. I say almost, because I embellished the design by making the business end long enough to go ALL THE WAY THROUGH the barrels so you can align the dimple (or, on newer models, a screw-on point) into the tip of the tool's shaft with the end of the plunger shaft and slide the shaft right through the seal without poking around blindly. The shaft of this tool is the same diameter as the plunger shaft, so the junction of the two shafts slides through the rear seal. And of course, in an application lioke this, silicone grease should be used.
A second impprovement that I've made is that I've put a threaded hole in the end of the tool shaft where Sheaffer's design only had a dimple on the end. You can now screw this tool onto the pen's plunger shaft.
A third improvement is that there is a screw-on pointed tip that you can use to guide the shaft of the tool through the back of the seal and into the pen barrel. This is especially helpful after you've replaced the rear seal (say, with our RZ tool). JUST BE CAREFUL; THIS SCREW ON TIP IS SHARP. DON'T PUT YOUR HAND OR OTHER PARTS OF YOUR BODY IN THE PATH OF THE SHARP TIP!!! a NEW SEAL WILL REQUIRE SOME FORCE TO GET THE TOOL'S SHAFT THROUGH IT.
$20
The pen plunger shaft shown below is not included with the item; it is shown for illustrative purposes. The screw-on point is the same diameter as the pen's plunger shaft; the putty shown on the tip below is there to keep the point from rolling while it was being photogrraphed.
(this tool, with the pointed, screw on tip removed, also fits through the hole in the tip of a snorkel sac protector to help push the front plug out of the sac protecror. A lot of heat helps in this application).
To buy please email Pentooling. BE SURE TO INCLUDE YOUR SHIPPING ADDRESS SO WE CAN PROVIDE A PRICE WITH SHIPPING COSTS INCLUDED. International customers please provide your street address, city, province/prefecture even if that info is included in your postal code, to avoid problems with the US Post Office website when shipping your order.
$20

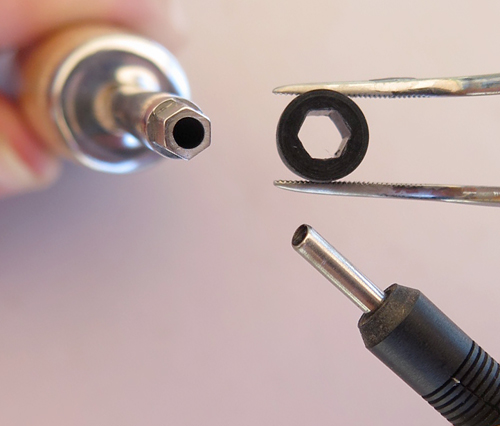
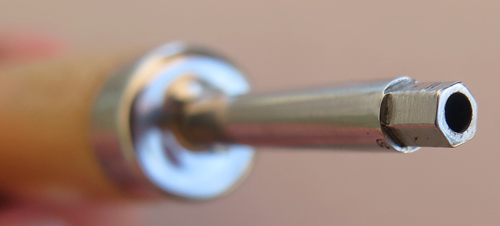
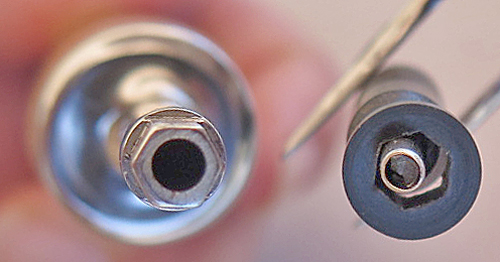
To buy please email Pentooling. Be sure that Paypal has your correct shipping address in your profile. We use them to generate our shipping labels and we cannot correct them, only you can.
$20
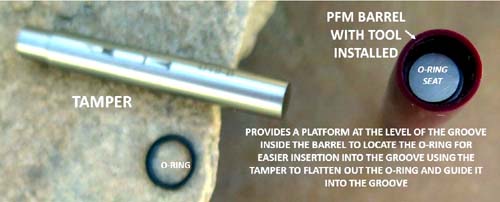
O-RING SEATER SHOWN WITH TAMPER ON RIGHT
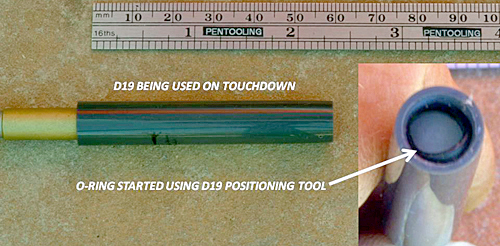
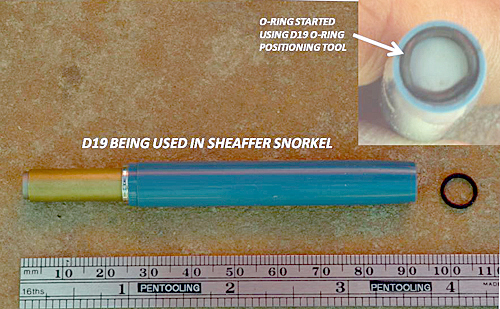
HERE'S A PAGE FROM A SHEAFFER REPAIR MANUAL
To buy please email Pentooling. Be sure and provide a shipping address so a shipping cost can be calculated. Please make sure PayPal has your correct shipping address, as we use PayPal to generate our shipping labels.
$20
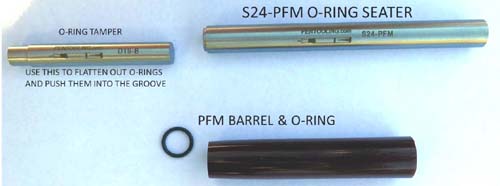

To buy please email Pentooling. BE SURE TO INCLUDE YOUR SHIPPING ADDRESS SO WE CAN PROVIDE A PRICE WITH SHIPPING COSTS INCLUDED. Please make sure PayPal has your correct shipping address, as we use PayPal to generate our shipping labels..
ITEM #D9: SHEAFFER PLUNGER SHAFT GUIDE - IMPROVED. This and the next four tools are intended to prevent you from going nuts while working on Sheaffer pneumatics (Plungers, Snorkels, and TouchDowns).
This tool makes it unnecessary for you to poke the plunger shaft around trying to find the hole that goes through the rear of the barrel /seal while inserting the threaded tip of the plunger back through the seal. This operation is especially difficult since the plunger shaft length is close to the length of the barrel and your fingers don't fit into the barrel. This is almost an exact duplicate of the Sheaffer tool found in Sheaffer repair guy's tool kits. I say almost, because I embellished the design by making the business end long enough to go ALL THE WAY THROUGH the barrels so you can align the dimple in the tip of the tool's shaft with the end of the plunger shaft and slide the shaft right through the seal without poking around blindly. The shaft of this tool is the same diameter as the plunger shaft, so the junction of the two shafts slides right through the rear seal.
This tool is also very useful in helping to push the sac protector plug out of a Snorkel (entering through the back hole in the sac protector), with the help of a little heat and a very tiny knife worked around the circumference of the plug, being careful not to cut off the plug's ears.
$20

To buy please email Pentooling. Be sure and provide a shipping address so a shipping cost can be calculated. Please make sure PayPal has your correct shipping address, as we use PayPal to generate our shipping labels.
NOTE: The three brushes presented below are all different sizes and are not interchangable; we've scoured the planet to find the perfect sized brush for each application below.
ITEM #STD SNORK BRUSH: This brush is the optimal diameter to clean-out the sac residue that becomes welded onto the walls of the metal sack protector found inside a Sheaffer Standard sized snorkel. If you run into the problem where the complete sac won't come out because it is stuck to the walls of the sac protector after you've gotten the sac protector off of the pen and removed the plug, go outdoors and put the sac protector in a shot glass and fill the shot glass with acetone. Don't do this indoors, don't let kids near it, and don't get the acetone on yourself or the rest of your pen, and warn anyone that gets near it what you're doing so they don't drink it. Let the sac protector soak for about a half hour, remove it from the acetone, and clean the old (now softened) rubber out with this brush. No need to ruin your foil-thin metal sac protector with a drill bit, which can come out the opposite end of the sac protector along the axis or ruin it by having the drill bit push the rock-hard old rubber outward in a radial direction.
$10
To buy please email Pentooling. Be sure and provide a shipping address so a shipping cost can be calculated. Please make sure PayPal has your correct shipping address, as we use PayPal to generate our shipping labels.
ITEM #PFM BRUSH: This brush is the optimal diameter to clean-out the sac residue that becomes welded onto the walls of the metal sack protector found inside a Sheaffer PFM snorkel. If you run into the problem where the complete sac won't come out because it is stuck to the walls of the sac protector after you've gotten the sac protector off of the pen and removed the plug, go outdoors and put the sac protector in a shot glass and fill the shot glass with acetone. Don't do this indoors, don't let kids near it, don't get the acetone on yourself or the rest of your pen, and warn anyone that gets near it what you're doing so they don't drink it. Let the sac protector soak for about a half hour, remove it from the acetone, and clean the old (now softened) rubber out with this brush.
$8
To buy please email Pentooling.
ITEM #TOUCHDOWN BRUSH: This brush is the optimal diameter to clean-out the sac residue that becomes welded onto the walls of the metal sack protector found inside a Sheaffer Touchdown. If you run into the problem where the complete sac won't come out because it is stuck to the walls of the sac protector after you've gotten the sac protector off of the pen and removed the plug, go outdoors and put the sac protector in a shot glass and fill the shot glass with acetone. Don't do this indoors, don't let kids near it, don't get the acetone on yourself or the rest of your pen, and warn anyone that gets near it what you're doing so they don't drink it. Let the sac protector soak for about a half hour, remove it from the acetone, and clean the old (now softened) rubber out with this brush.
$8
To buy please email Pentooling. Be sure and provide a shipping address so a shipping cost can be calculated. Please make sure PayPal has your correct shipping address, as we use PayPal to generate our shipping labels.
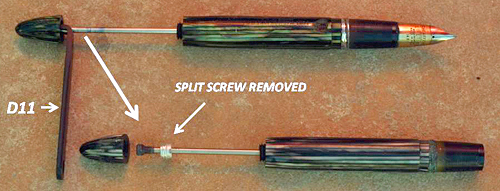
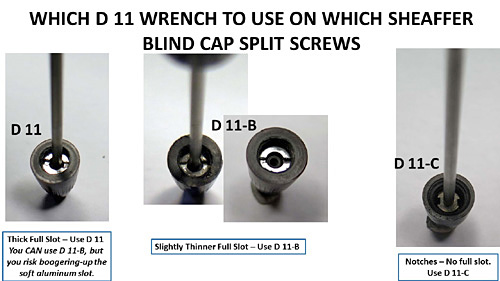
There are 4 different methods Sheaffer used to terminate the threaded plunger shafts into its blind caps; one simply employed the screwing of the shaft into the blind cap requiring little more than some sort of soft pliers to hold the shaft while the blind cap is being turned, and 3 other methods utilized unique screws with the shafts going through the centers, described as follows (PLEASE READ THIS BEFORE PLACING AN ORDER):
A) A screw with a relatively fatter slot releasable using wrench D 11.
B) A screw with a thinner slot releasable using wrench D 11-B. You COULD sometimes use wrench D 11-B on the fatter slotted screw in A), above, but you would booger-up the slot in the very soft aluminum, much the same way that too small of a regular screw driver would damage a slot thicker than that for which the screw driver was intended. That is, you might be able to use a D11B tool in a D11 slot IF YOUR BLIND CAP HAS WIDE ENOUGH THREAD CLEARANCE INSIDE THE BLIND CAP FOR THE D 11-B, which isn't always the case. If there is play when the tool is inserted into the slot, better go to tool D 11 before applying torque.
C) A screw with just a notch on either side of the shaft on the circumference of the screw, not a continuous slot, releasable using wrench D 11-C.
68% of the 166 pens and parts pens in my inventory that I’ve checked use the first, more simple, direct screwing of the shaft into the blind cap using no screw while 7% utilize method A) above, 18% utilize method B), and 8% utilize method C).
Need to figure out if your screw slot requires a D11 or a D11B? If you have very tiny drill bits, try this, using the back ends of drill bits: a screw slot requiring a D11B can accept a 0.036" maximum drill bit back end. A slot requiring a D11 tool can take in a 0.061"drill bit back end. The 0.061 drill bit will not fit into the screw slot that requires a D11B.
The D11 tool is also narrower in terms of blind cap thread clearance than a D11B.
Please specify which model when ordering.
.$10 ea.
To buy please email Pentooling. Be sure and provide a shipping address so a shipping cost can be calculated. Please make sure PayPal has your correct shipping address, as we use PayPal to generate our shipping labels.
$20
O-RING SEATER SHOWN WITH TAMPER ON RIGHT


HERE'S A PAGE FROM A SHEAFFER REPAIR MANUAL
To buy please email Pentooling. Be sure and provide a shipping address so a shipping cost can be calculated. Please make sure PayPal has your correct shipping address, as we use PayPal to generate our shipping labels.
$20


To buy please email Pentooling. Be sure and provide a shipping address so a shipping cost can be calculated. Please make sure PayPal has your correct shipping address, as we use PayPal to generate our shipping labels.
Pkg. of 10 for $20
To buy please email Pentooling. Be sure and provide a shipping address, so we can calculate shipping cost. Please update your latest address with Paypal, as we use them to create our shipping labels.
Pkg. of 10 for $20
To buy please email Pentooling. Be sure and provide a shipping address, so we can calculate shipping cost. Please update your latest address with Paypal, as we use them to create our shipping labels.
$12


To buy please email Pentooling. Be sure and provide a shipping address so a shipping cost can be calculated. Please make sure PayPal has your correct shipping address, as we use PayPal to generate our shipping labels.
NOTE: The three brushes presented below are all different sizes and are not interchangable; we've scoured the planet to find the perfect sized brush for each application below.
ITEM #STD SNORK BRUSH: This brush is the optimal diameter to clean-out the sac residue that becomes welded onto the walls of the metal sack protector found inside a Sheaffer Standard sized snorkel. If you run into the problem where the complete sac won't come out because it is stuck to the walls of the sac protector after you've gotten the sac protector off of the pen and removed the plug, go outdoors and put the sac protector in a shot glass and fill the shot glass with acetone. Don't do this indoors, don't let kids near it, and don't get the acetone on yourself or the rest of your pen, and warn anyone that gets near it what you're doing so they don't drink it. Let the sac protector soak for about a half hour, remove it from the acetone, and clean the old (now softened) rubber out with this brush. No need to ruin your foil-thin metal sac protector with a drill bit, which can come out the opposite end of the sac protector along the axis or ruin it by having the drill bit push the rock-hard old rubber outward in a radial direction.
$10
To buy please email Pentooling.
ITEM #PFM BRUSH: This brush is the optimal diameter to clean-out the sac residue that becomes welded onto the walls of the metal sack protector found inside a Sheaffer PFM snorkel. If you run into the problem where the complete sac won't come out because it is stuck to the walls of the sac protector after you've gotten the sac protector off of the pen and removed the plug, go outdoors and put the sac protector in a shot glass and fill the shot glass with acetone. Don't do this indoors, don't let kids near it, don't get the acetone on yourself or the rest of your pen, and warn anyone that gets near it what you're doing so they don't drink it. Let the sac protector soak for about a half hour, remove it from the acetone, and clean the old (now softened) rubber out with this brush.
$7
To buy please email Pentooling.
ITEM #TOUCHDOWN BRUSH: This brush is the optimal diameter to clean-out the sac residue that becomes welded onto the walls of the metal sack protector found inside a Sheaffer Touchdownl. If you run into the problem where the complete sac won't come out because it is stuck to the walls of the sac protector after you've gotten the sac protector off of the pen and removed the plug, go outdoors and put the sac protector in a shot glass and fill the shot glass with acetone. Don't do this indoors, don't let kids near it, don't get the acetone on yourself or the rest of your pen, and warn anyone that gets near it what you're doing so they don't drink it. Let the sac protector soak for about a half hour, remove it from the acetone, and clean the old (now softened) rubber out with this brush.
$7
To buy please email Pentooling. Be sure and provide a shipping address so a shipping cost can be calculated. Please make sure PayPal has your correct shipping address, as we use PayPal to generate our shipping labels.
$125
To buy please email Pentooling. Be sure that Paypal has your correct shipping address in your profile. We use them to generate our shipping labels and we cannot correct them, only you can.
$xxx
To buy please email Pentooling. Be sure and provide a shipping address so a shipping cost can be calculated. Please make sure PayPal has your correct shipping address, as we use PayPal to generate our shipping labels.
Return to TOP
